| C++与C之间相互接口和库函数调用 | AderXCoding/language/c/cpp |
C++中调用C的接口
我们在阅读一些库的代码的时候,经常看到有些函数被extern“C”来修饰
extern“C”引入C的库代码
如下所示
extern 'C' void func();如果需要修饰的函数比较多,则使用如下方式
如果你不想理解这段代码的意义,那么请你记住:在你的代码不知道是被c调用还是c++调用时,请添加此段代码.
下面详细说明此段代码的意义:__cplusplus是c++编译器(如g++等)定义的宏,如果是c++调用的话,extern'C'声明会有效.如果时c调用的话,那么,extern“C”`声明无效
要明白为何使用extern“C”,还得从cpp中对函数的重载处理开始说起.
在c++中,为了支持重载机制,在编译生成的汇编码中,要对函数的名字进行一些处理,加入比如函数的返回类型等等.而在C中,只是简单的函数名字而已,不会加入其他的信息.
也就是说:C++和C在编译后对产生的函数名字的处理是不一样的.而上面的代码extern'C'目的就是主要实现C与C++的相互调用问题.
对于C++编译器,由于__cplusplus宏被定义,因此通过extern'C'来通知C++编译器编译后的代码是按照C的obj文件格式编译的,要连接的话按照C的命名规则去找.
C和C++对函数的处理方式是不同的.extern'C'是使C++能够调用C写作的库文件的一个手段,如果要对编译器提示使用C的方式来处理函数的话,那么就要使用extern'C'来说明.
这种方法有两种妙用
在C源代码中使用extern“C”这样代码及时添加到C++的项目工程中,也可以正常的被编译和链接多数情况下我们C的库都是SDK(包括头文件和lib包),没有源代码,那么在我们的C++代码中使用extern“C”就通知编译器我们引入了C库的代码
示例程序
下面我们通过一个示例来看看C++中如果调用C的函数,代码在language/c/cpp/cpp_link_c
我们在adc中定义了一个add函数,这个函数是C语言实现的函数接口
// add.c
#include
#include


int add(const int a, const int b)
{
    return (a + b);
}
我们C++中在main函数调用C语言实现的add函数
// main.cpp
#include
using namespace std;
#ifdef __cplusplus
extern 'C'
{
#endif
int add(const int a, const int b);
#ifdef __cplusplus
}
#endif
int main( )
{
std::cout <下面是我们的Makefile信息,我们生成了两个可执行程序main_normal和main_sdk
main_normal为maio和ado直接编译生成,C++中通过extern“C”直接以源码的方式生成了main_normalmain_sdk类似于我们开发的方式,首先用adc生成了一个sdk库libadso,然后maic中通过extern“C”以C的方式链接了libadso中的add函数,生成了main_sdk
# the compile options
CFLAGS = -Wall -std=gnu99 -O2 -pedantic -Wextra -g
CXXFLAGS = -Wall -std=c++11 -O2 -pedantic -Wextra -g
SHAREDLIB_LINK_OPTIONS = -shared
FPIC = -fPIC
# the include directory
INC = -I./
target=main_sdk main_normal libadd.so
all:$(target)
main_sdk : main.o libadd.so
$(CXX) $^ -o $@ -L./ -ladd
main_normal : main.o add.o
$(CXX) $^ -O $@
libadd.so : add.o
$(CC) $(SHAREDLIB_LINK_OPTIONS) $(FPIC) $(LDFLAGS) $^ -o $@
#libmyclass.a:myclass.o func.o
# ar crv $@ $^
%.o : %.cpp
$(CXX) $(FPIC) $(CXXFLAGS) -c $^ -o $@ $(INC)
%.o : %.c
$(CC) $(FPIC) $(CFLAGS) -c $^ -o $@ $(INC)
clean :
rm -rf *.o
rm -rf $(target)

由于C++是高度兼容C的,只需要通知C++编译器按照C的命名方式编译和链接二进制代码即可,除了编译命名的处理不需要额外的层次,因此这种方式很好的解决了,C++代码中编译链接C源代码的问题
但是C语言却不支持C++面向对象的特性,这个问题该怎么解决啊.
C调用C++的函数接口信息
前面我们讲解了,C++是一个C基础上扩展的支持面向对象的高级语言,因此我们将C调用C++的函数的方法分为面向过程和面向对象两种特性分开讨论.
C中调用C++中基本的数据和成员(面向过程的数据)C中调用C++中类成员数据(面向对象的数据)
C中调用C++的接口
C++面向过程的部分是完全兼容C的,因此其本质上俊只是编译阶段的处理不同而已,但是C++也引入了一些新的特性,比如函数重载等,这些需要我们单独去兼容.
C中调用C++数据和成员(面向过程的数据)
基本函数的处理
这部分C与C++是完全兼容的,没有区别,因此使用extern“C”的方式就足以处理.
将C++函数声明为”extern“C”(在你的C++代码里做这个声明),然后调用它(在你的C或者C++代码里调用).
例如:
我们有adcpp做出的一套C++的库接口,其中包含add函数接口,但是这套接口是C++的,我们想要在C程序中使用这个C++的库接口,该如何实现呢
我们同样以一段示例来展示,参见language/c/cpp/c_link_cpp_func
首先是我们的C++库的源代码
我们想要在C程序中使用这个函数接口,但是C++并不兼容C的接口,考虑我们可以通过增加一个中间层来实现,进行一次封装,将C++的库封装成C编译器可识别的形式
中间层libadcpp的形式如下,其实就是用C++编译器编译出一套C编译器可识别的代码,同样是通过extern'C'来实现,将add函数封装成call_cpp_add函数
// libadd.cpp
int add(const int a, const int b);
#ifdef __cplusplus
extern 'C'
{
#endif
int call_cpp_add(const int a, const int b)
{
return add(a, b);
}
#ifdef __cplusplus
}
#endif那这样以来call_cpp_add函数虽然用C++编译器编译,但是编译成C编译器可识别的格式,我们就可以在C源程序main中调用C编译器可以识别的call_cpp_add函数.
// main.c
#include
#include
int call_cpp_add(const int a, const int b);
int main( )
{
printf('%d
', call_cpp_add(2, 4));
return 0;
} 下面是Makefile的信息
# the compile options
CFLAGS = -Wall -std=gnu99 -O2 -pedantic -Wextra -g
CXXFLAGS = -Wall -std=c++11 -O2 -pedantic -Wextra -g
SHAREDLIB_LINK_OPTIONS = -shared
FPIC = -fPIC
# the include directory
INC = -I./
target=main_sdk libadd.so
all:$(target)
main_sdk : main.o libadd.so
$(CC) $^ -o $@ -L./ -ladd -lstdc++
libadd.so : libadd.o add.o
$(CXX) $(SHAREDLIB_LINK_OPTIONS) $(FPIC) $(LDFLAGS) $^ -o $@
%.o : %.cpp
$(CXX) $(FPIC) $(CXXFLAGS) -c $^ -o $@ $(INC)
%.o : %.c
$(CC) $(FPIC) $(CFLAGS) -c $^ -o $@ $(INC)
clean :
rm -rf *.o
rm -rf $(target)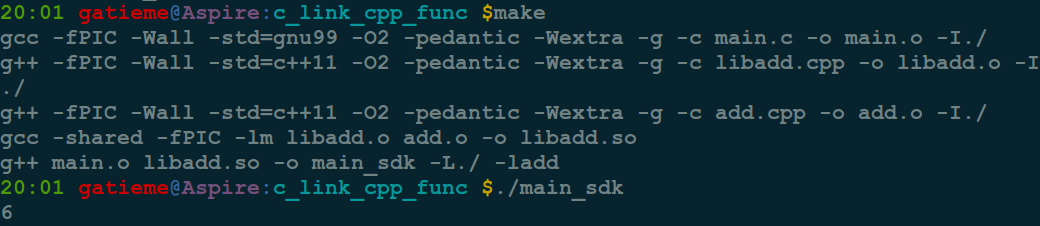
C语言调用C++重载函数的处理
C++支持函数重载的,函数名相同但是参数不同的重载函数在编译后链接的名字并不相同而可以被识别,这种情况下,我们引入一个中间层的方法同样可以实现C中调用C++的函数接口,其实现与上一节C中调用C++非重载基本函数成员的实现没有什么区别,只是为各个重载函数均实现一套接口而已
我们仍然以一个示例来展示,代码参见language/c/cpp/c_link_cpp_overload_func
首先是我们的C++接口,如下所示
// add.cpp
//#include
int add(const int a, const int b)
{
return (a + b);
}
double add(const double a, const double b)
{
//std::cout <我们为此实现一个中间层libadcpp,通过C++编译器用extern'C'将其编译成C编译器可识别的接口
// libadd.cpp
int add(const int a, const int b);
double add(const double a, const double b);
#ifdef __cplusplus
extern 'C'
{
#endif
int call_cpp_add_int(const int a, const int b)
{
return add(a, b);
}
double call_cpp_add_double(const double a, const double b)
{
return add(a, b);
}
#ifdef __cplusplus
}
#endif最后是我们的C源程序,调用我们的中间层
// main.c
#include
#include
int call_cpp_add_int(const int a, const int b);
double call_cpp_add_double(const double a, const double b);
int main( )
{
printf('2 + 4 = %d
', call_cpp_add_int(2, 4));
printf('2.1 + 4.5 = %lf
', call_cpp_add_double(2.1, 4.5));
return 0;
} 最后是Makefile,我们通过中间层libadcpp将C++的接口转换成C编译器可以识别的格式,然后添加在我们的C源程序maic中
# the compile options
CFLAGS = -Wall -std=gnu99 -O2 -pedantic -Wextra -g
CXXFLAGS = -Wall -std=c++11 -O2 -pedantic -Wextra -g
SHAREDLIB_LINK_OPTIONS = -shared
FPIC = -fPIC
# the include directory
INC = -I./
target=main_sdk libadd.so
all:$(target)
main_sdk : main.o libadd.so
$(CC) $^ -o $@ -L./ -ladd -lstdc++
libadd.so : libadd.o add.o
$(CXX) $(SHAREDLIB_LINK_OPTIONS) $(FPIC) $(LDFLAGS) $^ -o $@
%.o : %.cpp
$(CXX) $(FPIC) $(CXXFLAGS) -c $^ -o $@ $(INC)
%.o : %.c
$(CC) $(FPIC) $(CFLAGS) -c $^ -o $@ $(INC)
clean :
rm -rf *.o
rm -rf $(target)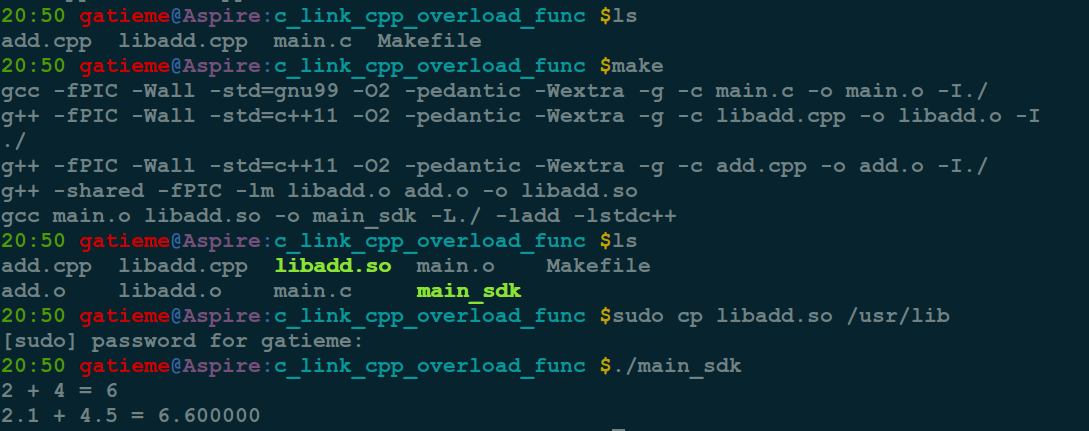
C中调用C++中类成员数据(面向对象的数据)
C调用C++中成员函数
同样以一个示例来展示调用的过程,代码参见language/c/cpp/c_link_cpp_mem_func
首先是myclass类的信息
/
// myclass.h
/
#ifndef __MY_CLASS_H_INCLUDE__
#define __MY_CLASS_H_INCLUDE__
#include
using namespace std;
class MyClass
{
public :
// member function
int add(int a, int b);
};
#endif // #define __MY_CLASS_H_INCLUDE__
/
// myclass.cpp
/
#include 'myclass.h'
// member function
int MyClass::add(int a, int b)
{
return (a + b);
} 接着我们实现的接口,call_cpp_class_add函数中创建了一个MyClass对象并调用了其成员函数add,由于extern'C'的作用C++编译器将libmyclass编译成了一个可以被C编译器链接的目标对象格式
/
// libmyclass.cpp
/
#include
using namespace std;
#include 'myclass.h'
#ifdef __cplusplus
extern 'C'
{
#endif
/* extern 'C' */int call_cpp_class_add(int a, int b)
{
MyClass mc;
return mc.add(a, b);
}
#ifdef __cplusplus
}
#endif 然后是main函数
/
// main.cpp
/
#include
#include
extern int call_cpp_class_add(int a, int b);
int main(void)
{
printf('2 + 4 = %d
', call_cpp_class_add(2, 4));
return 0;
} 最后附上我们的Makefile,静态库链接后生成了main,而动态链接库链接后生成了main_sdk
#####################
# Makefile
#####################
# the compile options
CFLAGS = -Wall -std=gnu99 -O2 -pedantic -Wextra -g
CXXFLAGS = -Wall -std=c++11 -O2 -pedantic -Wextra -g
SHAREDLIB_LINK_OPTIONS = -shared
FPIC = -fPIC
# the include directory
INC = -I./
target=libmyclass.so libmyclass.a main main_sdk
all:$(target)
main : main.o libmyclass.a
$(CC) $^ -o $@ -ldl -lstdc++
main_sdk : main.o libmyclass.so
$(CC) $^ -o $@ -ldl -lstdc++ -L./ -lmyclass
libmyclass.a : myclass.o libmyclass.o
ar crv $@ $^
libmyclass.so : libmyclass.o myclass.o
$(CXX) $(SHAREDLIB_LINK_OPTIONS) $(FPIC) $(LDFLAGS) $^ -o $@
%.o:%.cpp
$(CXX) $(FPIC) $(CXXFLAGS) -c $^ -o $@ $(INC)
%.o:%.c
$(CC) $(FPIC) $(CFLAGS) -c $^ -o $@ $(INC)
clean :
rm -rf *.o
rm -rf $(target)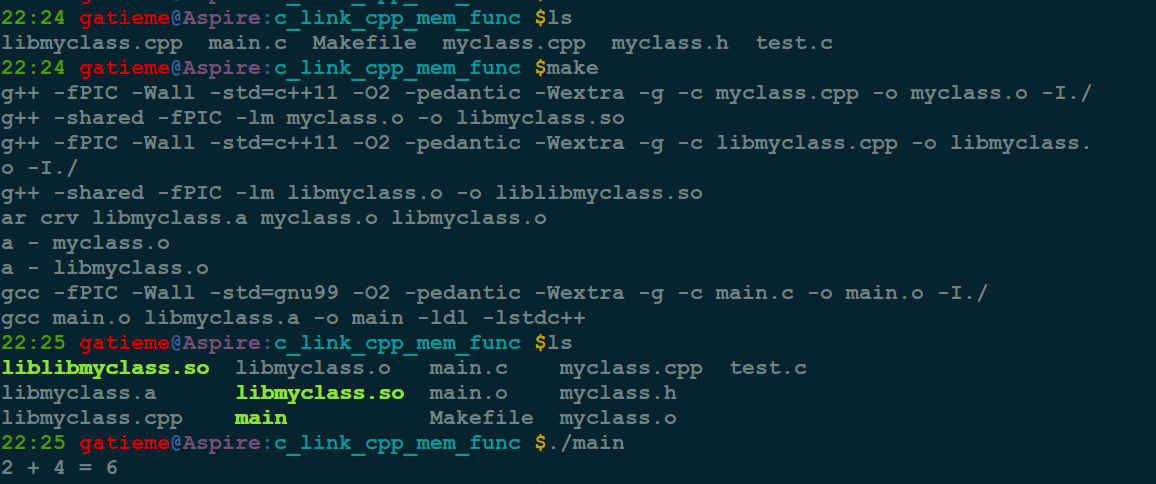
C调用C++中类函数
其实我们可以为类中每个函数对象都进行接口重构,然后在参数中加入类似this指针的参数
下面这个示例中,我们为C++的MyClass类实现了C的构造和析构函数,这样我们就相当于完成把一个C++写成的库完全做出了一套C语言的调用接口
首先是MyClass类,类中有一个虚函数func
/
// mfileyclass.h
/
#ifndef __MY_CLASS_H_INCLUDE__
#define __MY_CLASS_H_INCLUDE__
class MyClass
{
public :
virtual int func(int);
};
#endif // #define __MY_CLASS_H_INCLUDE__
/
// myclass.cpp
/
#include
#include 'myclass.h'
using namespace std;
int MyClass::func(int i)
{
cout <<'virtual function ' <然后是中间层libmyclass.h,中间层将C++的MyClass类对象进行了一个完整的封装
通过create_myclass()构造了一个指向MyClass的指针通过destroy_myclass(void*this释放类对象的指针通过call_myclass_func(MyClass*thismc,int调用MyClass::func()函数
/
// libmyclass.h
/
#ifndef __LIB_MY_CLASS_H_INCLUDE__
#define __LIB_MY_CLASS_H_INCLUDE__
#ifdef __cplusplus
extern 'C'
{
#endif
void* create_myclass( );
void destroy_myclass( void* thisC);
int call_myclass_func(void *thismc, int i);
#ifdef __cplusplus
}
#endif
#endif // #define __LIB_MY_CLASS_H_INCLUDE__
/
// libmyclass.cpp
/
#include
#include 'myclass.h'
#include 'libmyclass.h'
using namespace std;
#ifdef __cplusplus
extern 'C'
{
#endif
/* extern 'C' */void* create_myclass( )
{
return new MyClass( );
}
/* extern 'C' */void destroy_myclass( void* thisC)
{
delete static_cast(thisC);
}
/*extern 'C'*/int call_myclass_func(void *thismc, int i)
{
return static_cast(thismc)->func(i);
}
#ifdef __cplusplus
}
#endif 我们在主函数中调用了中间层的接口,来实现C语言中调用C++的接口
/
// main.cpp
/
#include
#include
#include 'libmyclass.h'
int main( )
{
void *pclass = create_myclass( );
call_myclass_func(pclass, 10);
destroy_myclass(pclass);
pclass = NULL;
return EXIT_SUCCESS;
} 最后我们依旧列出Makefile
#####################
# Makefile
#####################
# the compile options
CFLAGS = -Wall -std=gnu99 -O2 -pedantic -Wextra -g
CXXFLAGS = -Wall -std=c++11 -O2 -pedantic -Wextra -g
SHAREDLIB_LINK_OPTIONS = -shared
FPIC = -fPIC
# the include directory
INC = -I./
target=libmyclass.so libmyclass.a main main_sdk
all:$(target)
main : main.o libmyclass.a
$(CC) $^ -o $@ -ldl -lstdc++
main_sdk : main.o libmyclass.so
$(CC) $^ -o $@ -ldl -lstdc++ -L./ -lmyclass
libmyclass.a : myclass.o libmyclass.o
ar crv $@ $^
libmyclass.so : libmyclass.o myclass.o
$(CXX) $(SHAREDLIB_LINK_OPTIONS) $(FPIC) $(LDFLAGS) $^ -o $@
%.o:%.cpp
$(CXX) $(FPIC) $(CXXFLAGS) -c $^ -o $@ $(INC)
%.o:%.c
$(CC) $(FPIC) $(CFLAGS) -c $^ -o $@ $(INC)
clean :
rm -rf *.o
rm -rf $(target)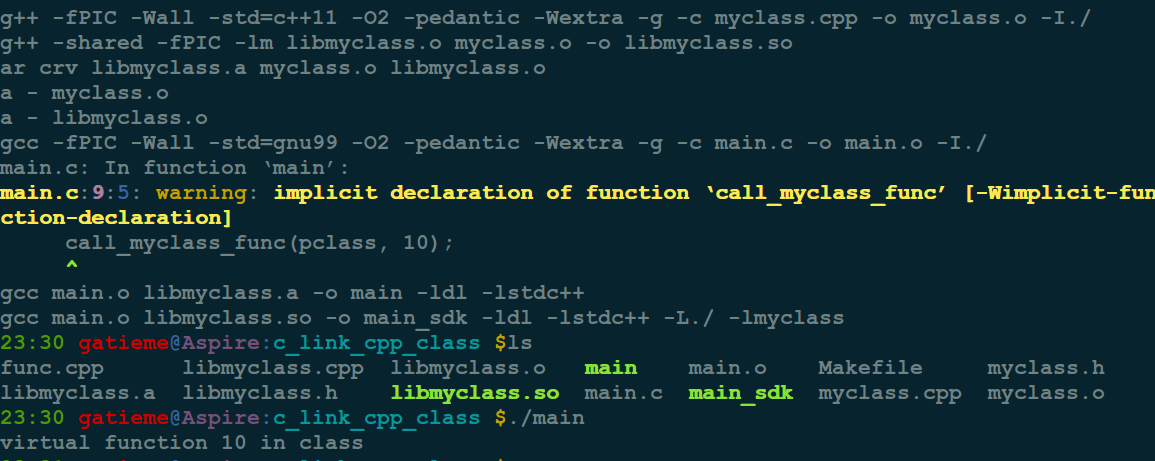
C调用C++的接口总结(wrapper方法和handle方法)
本文给出了一种方法.基本思想是,写一个wrapper文件.把C++类封装起来,对外只提供C语言的接口,和C++相关的都在wrapper的实现文件里实现
这里我们针对一个完整的类对象,实现一套接口,代码参见language/c/cpp/apple
C++的接口
/
// apple.h
/
#ifndef __APPLE_H_INCLUDE__
#define __APPLE_H_INCLUDE__
class Apple
{
public :
enum
{
APPLE_COLOR_RED,
APPLE_COLOR_BLUE,
APPLE_COLOR_GREEN,
};
Apple();
int GetColor(void);
void SetColor(int color);
private:
int m_nColor;
};
#endif // #define __APPLE_H_INCLUDE__/
// apple.cpp
/
#include
using namespace std;
#include 'apple.h'
Apple::Apple()
: m_nColor(APPLE_COLOR_RED)
{
}
void Apple::SetColor(int color)
{
this->m_nColor = color;
}
int Apple::GetColor(void)
{
return this->m_nColor;
} /
// applewrapper.h
/
#ifndef __APPLE_WRAPPER_H_INCLUDE__
#define __APPLE_WRAPPER_H_INCLUDE__
struct tagApple;
#ifdef __cplusplus
extern 'C'
{
#endif
struct tagApple *GetInstance(void);
void ReleaseInstance(struct tagApple **ppInstance);
extern void SetColor(struct tagApple *pApple, int color);
extern int GetColor(struct tagApple *pApple);
#ifdef __cplusplus
}
#endif
#endif // #define __APPLE_WRAPPER_H_INCLUDE__/
// applewrapper.cpp
/
#include 'applewrapper.h'
#include 'apple.h'
#ifdef __cplusplus
extern 'C'
{
#endif
struct tagApple
{
Apple apple;
};
struct tagApple *GetInstance(void)
{
return new struct tagApple;
}
void ReleaseInstance(struct tagApple **ppInstance)
{
delete *ppInstance;
*ppInstance = 0;
}
void SetColor(struct tagApple *pApple, int color)
{
pApple->apple.SetColor(color);
}
int GetColor(struct tagApple *pApple)
{
return pApple->apple.GetColor();
}
#ifdef __cplusplus
}
#endif/
// main.c
/
#include 'applewrapper.h'
#include
int main(void)
{
struct tagApple * pApple;
pApple = GetInstance();
SetColor(pApple, 1);
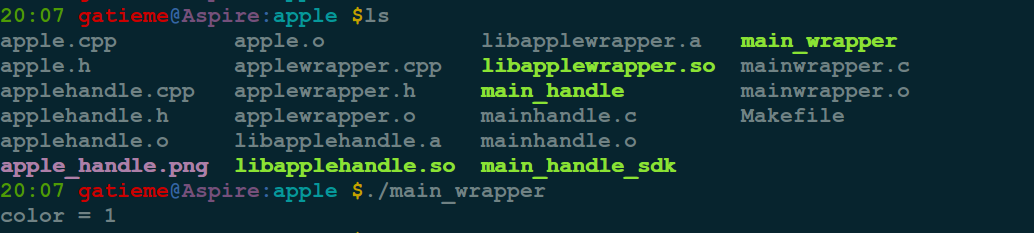
int color = GetColor(pApple);
printf('color = %d
', color);
ReleaseInstance(&pApple);
assert(pApple == 0);
return 0;
} 
其实,wrapper里的struct完全可以不要,定义一个handle更好
/
// applehandle.h
/
#ifndef __APPLE_HANDLE_H_INCLUDE__
#define __APPLE_HANDLE_H_INCLUDE__
#ifdef __cplusplus
extern 'C' {
#endif
int GetInstance(int *handle);
void ReleaseInstance(int *handle);
extern void SetColor(int handle, int color);
extern int GetColor(int handle);
#ifdef __cplusplus
};
#endif
#endif // #define __APPLE_HANDLE_H_INCLUDE__/
// applehandle.cpp
/
#ifdef __cplusplus
extern 'C' {
#endif
static std::vector g_appleVector;
int GetInstance(int * handle)
{
g_appleVector.push_back(new Apple( ));
*handle = 0;
return 1;
}
void ReleaseInstance(int *handle)
{
Apple * papple = g_appleVector[*handle];
g_appleVector.erase(g_appleVector.begin( ) + *handle);
delete papple;
*handle = -1;
}
void SetColor(int handle, int color)
{
g_appleVector[handle]->SetColor(color);
}
int GetColor(int handle)
{
return g_appleVector[handle]->GetColor();
}
#ifdef __cplusplus
}
#endif /
// mainhandle.cpp
/
#include 'applehandle.h'
#include
int main(void)
{
int handle;
GetInstance(&handle);
SetColor(handle, 1);
int color = GetColor(handle);
printf('color = %d
', color);
ReleaseInstance(&handle);
return 0;
} #####################
# Makefile
#####################
# the compile options
CFLAGS = -Wall -std=gnu99 -O2 -pedantic -Wextra -g
CXXFLAGS = -Wall -std=c++11 -O2 -pedantic -Wextra -g
SHAREDLIB_LINK_OPTIONS = -shared
FPIC = -fPIC
# the include directory
INC = -I./
target=main_wrapper
all:$(target)
main_wrapper : main.o libapplewrapper.a
$(CC) $^ -o $@ -lstdc++
main_handle : main.o libapplehandle.a
$(CC) $^ -o $@ -lstdc++
main_wrapper_sdk : main.o libapplewrapper.so
$(CC) $^ -o $@ -lstdc++ -L./ -lapplewrapper
main_handle_sdk : main.o libapplehandle.so
$(CC) $^ -o $@ -lstdc++ -L./ -lapplehandle
libapplewrapper.a:apple.o applewrapper.o
ar crv $@ $^
libapplehandle.a:apple.o applehandle.o
ar crv $@ $^
libapplewrapper.ao : apple.o applewrapper.o
$(CXX) $(SHAREDLIB_LINK_OPTIONS) $(FPIC) $(LDFLAGS) $^ -o $@
libapplehandle.ao : apple.o applehandle.o
$(CXX) $(SHAREDLIB_LINK_OPTIONS) $(FPIC) $(LDFLAGS) $^ -o $@
%.o:%.cpp
$(CXX) $(FPIC) $(CXXFLAGS) -c $^ -o $@ $(INC)
%.o:%.c
$(CC) $(FPIC) $(CFLAGS) -c $^ -o $@ $(INC)
clean :
rm -rf *.o
rm -rf libapple.so libapple.a
rm -rf $(target)参照
1.2 extern “C” C++中引入C的库代码 language/c/cpp/cpp_link_c2.1.1 C调用C++的基本成员函数 language/c/cpp/c_link_cpp_func2.1.2 C语言调用C++重载函数的处理 language/c/cpp/c_link_cpp_overload_func2.2.1 C调用C++中成员函数 language/c/cpp/c_link_cpp_mem_func2.2.2 C调用C++中类函数 language/c/cpp/c_link_cpp_class2.3 C调用C的接口总结 language/c/cpp/apple
c语言调用C++库c语言调用c++函数(.a,.so)如何用C语言封装C++的类,在C里面使用
文章为作者独立观点,不代表股票交易接口观点
相关文章


![[Unity接口]子类即继承接口类也继承MonoBehaviour的快速操作和重构实现](/uploads/allimg/220625/2041055129-0-lp.jpg)
股民评论